
Setting up a database connection (Java+mysql)

Initially, it is essential to set up the database connection.

STEP 1:

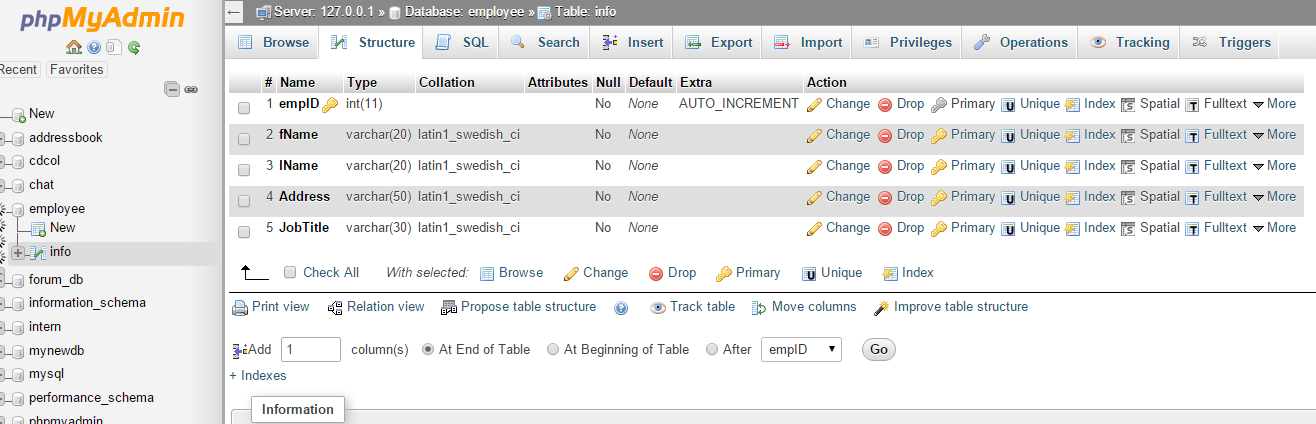
Create a database in phpmyadmin and create the required table.


STEP 2:

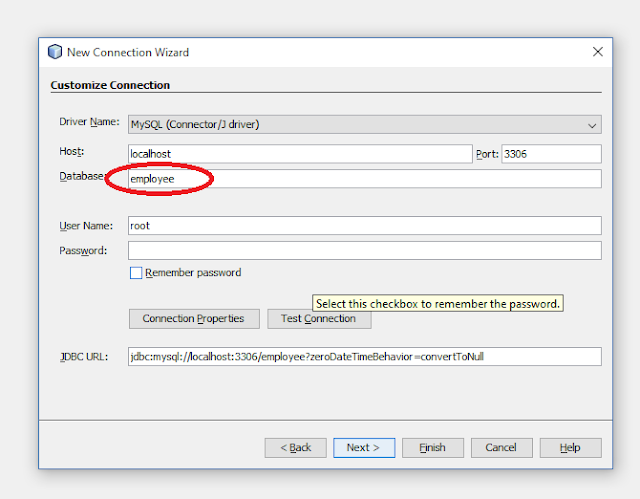
Set up a new connection in Net Beans.

1. Right Click on Databases(Services tab) -> Select New Connection


2. Select MySQL -> Select Next


3. Enter the name of your database -> TEST CONNECTION


4. If you see the below added to your services, then the connection has been set up successfully.


STEP 3:

Add a library to the net beans project as below.


STEP 4:    Creating the Database Connect Class
1. Create a new package under the project and create a new class called 'DBconnect' under that package.

2. DBconnect class should look like below.


 In the line,
        con = (Connection) DriverManager.getConnection("jdbc:mysql://localhost:3306/employee","root","");

The highlighted path can be optained from the services pane where we established a connection to the relevant DB.

Now, whenever you need to connect to the database, all you have to do is call this connect method.


Comments

Popular posts from this blog

Admin panel of a Q & A Forum

In a Q & A Forum, when a user posts a question, it should be sent to the administrator for approval in case it contains inappropriate content. After approval it should be removed from this pending approval page and other users should be able to see the question afterwards. To enable this, we should maintain an approval column in our database table of records and for each record approval should be set to false by default. In the Pending approvals page only the records with approval=false should be displayed. Below is  the MySQL  statement for retrieval, $sql="SELECT * FROM topics WHERE approval=false"; To know which post was approved we should embed the post_id to the URL. And the relevant post should be updated as approval=true. Below is the complete code. <?php $sql="SELECT * FROM topics WHERE approval=false"; $query=mysqli_query($conn,$sql); echo '<form name="approve" method="p...

Calculator using PHP

This Calculator model will take inputs from the Number 1 and Number 2 fields and when the user clicks on the relevant operator the result will be displayed in the Results field. For log10(), to radian, to degree, sin, cos, tan operations only require one input. Hence, the user is instructed to input the values to the 1st field only. First, before proceeding with the calculation, we need to obtain the values from the text boxes. For that we should include all the form elements inside a form. The result is directed to the same page. Therefore we will use the form action as $_SERVER['PHP_SELF'] and the method as post. Next, we can obtain the values in the text boxes.       $_POST[' form_element_name '] will give you the value of the respective element. We can write the php code as follows (in the <head>) to obtain the value from Number 1 and Number 2 fields.       <?php              $num1=...

Getting Started with OAuth 2.0 using WSO2 Identity Server 5.3.0 and Playground2 Sample

This blog post provides step by step instructions for trying out OAuth 2.0 using WSO2 Identity Server . Here I use Identity Server 5.3.0 which is the latest released version by the time of this writing. The official documentation for this is available in https://docs.wso2.com/display/IS530/OAuth+2.0+with+WSO2+Playground , however for a beginner, it does not provide all the instructions such as creating a Service Provider with necessary configuration. However, by following the steps below, you can simply setup Identity Server and the playground2 sample webapp and test the entire OAuth 2.0 flow. Creating the Service Provider First step is to create a service provider in Identity Server. This is required because when a client application talks to Identity Server via OAuth 2.0, Identity Server has to identify the client and the incoming traffic. We set this configuration inside the service provider. Login to the Management Console of Identity Server and create a service provi...