

Introduction
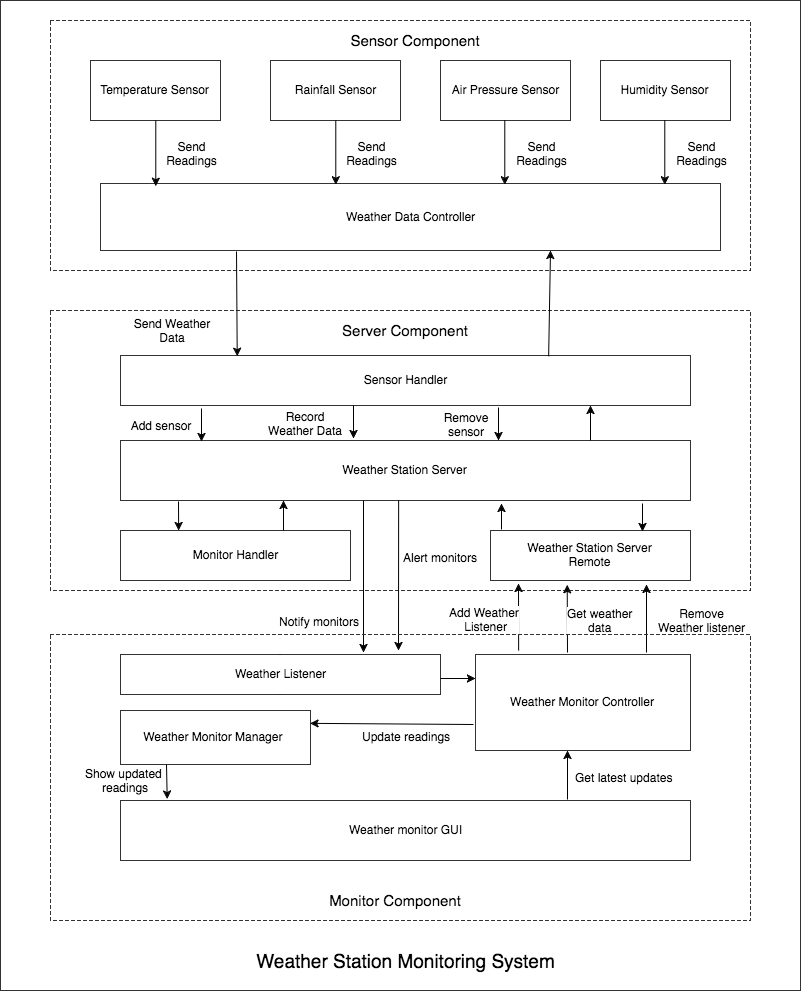
This system is a weather monitoring system for mobile base-stations around the country. It uses sensors that can measure temperature, air pressure, humidity and rainfall. Sensors are placed in different locations.
It consists of 3 main components namely, the sensors, a remote server and the monitors. The sensors send updates of the weather readings to the server every 5 mins. The server will store these values and update the monitors periodically every 1 hour with the latest readings at each station.
Monitors will show all the latest weather readings at all locations. Additionally, to receiving periodic updates, monitors are able to query for the latest readings of all the stations or of one location at any time if required. Monitors can view the number of sensors and monitors connected to the server at any given time.
The server will alert the monitors if the weather at any location reaches the critical values specified below.
Temperature - If exceeds 350 C or is below 200 C
Rainfall - If exceeds 20mm
Server will also alert the monitors if any sensor stops responding.
Overview of the implementation
The system is implemented in Java, using Java RMI and Sockets.
The sensors establishes a socket connection with the remote server via TCP/IP ports in order to send updates to the remote server. Socket connections are ideal to establish communication between two processes specially in this scenario where sensor and server may run at two different machines. Readings are serialized and encoded using Base64 and passed through socket communication to the server where they are deserialized and decoded.
The monitors use Java RMI connections to communicate with the remote server. This enables the monitors to invoke methods in the server remotely. The server and monitors will need to perform complex operations and this can be difficult through a socket connection. Java RMI is highly optimized and serves this purpose well.
All the readings received by the server from the sensors are written to a text file.
GitHub repo : https://github.com/dinuish94/weather-station
Running the program
1) Running the server

2) Adding sensors

3) Running the monitor

High level Diagram
Sequence Diagrams
Diagram 1 : Addition of a weather sensor and sending periodic updates to the monitor
Assumption : Assumes a monitor is already connected to the system.
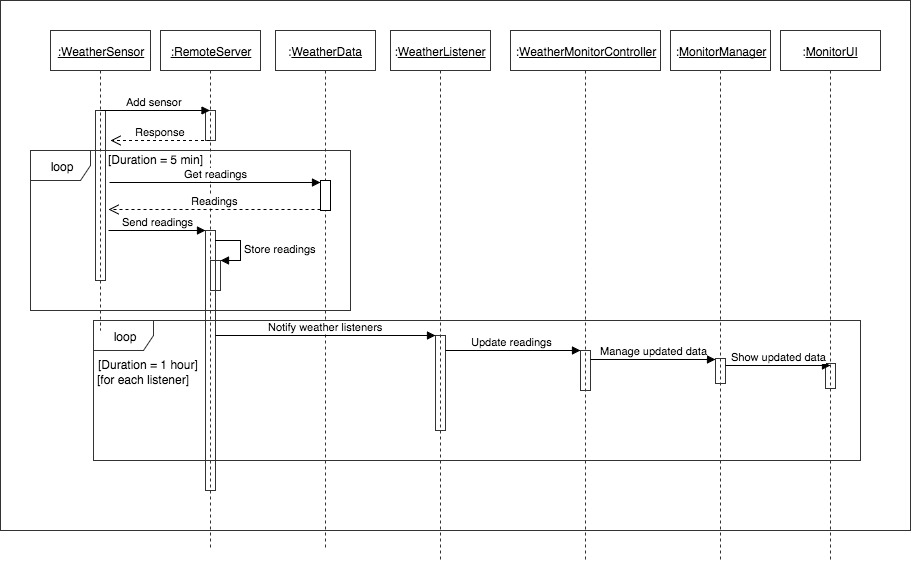
Diagram 2 : Add or remove monitors
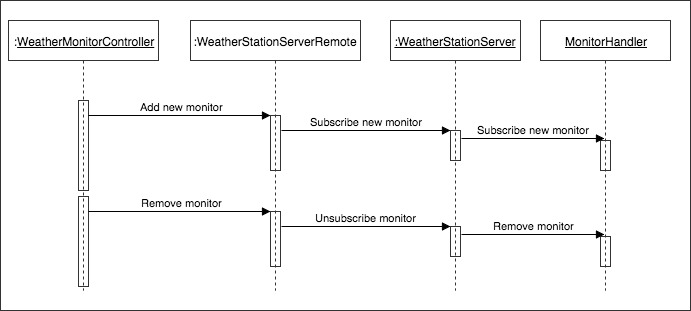
Diagram 3 : Query readings by the monitor

Diagram 4 : Alert monitors when the weather reaches critical levels or when a sensor is down

Assumptions
- There is only one sensor at a particular location and all the readings such as temperature, rainfall, air pressure and humidity are measured by the same.
- Only a person with admin rights (admin credentials can put up a server).
- There can be only one instance of a particular sensor up and running. If one person is currently logged in to the sensor, another cannot run it since the username for sensor log in is the same unique name of the sensor.
- Sensor and monitor are both authenticated by credentials in the text files and they should be configured in order to add new credentials.
- IOT sensor behavior is simulated by simple Java programs.
Comments
Post a Comment